My Useful Info App
Coming Soon...We Hope ; )
Overview
This app enables you to scan, organize, search, and generate custom PDF reports from images taken by your phone and/or text entered. This app is great for:
Business Expense - Just snap a picture of a receipt and give it a label like Business Expenses. At the end of the year, you can generate a report with all your business expenses to give to your accountant.
Home Improvements - Take a picture of an invoice and/or material purchases. If you are managing multiple properties, just create unique labels for each property to sort/search expenses.
Smart Shopping - Quickly snap a picture of the price and specs of one product and do the same for the others. Then generate a report to compare all your options without having to worry about forgetting a little detail.
Auto Repairs - Easily keep documented proof of auto repairs to help increase resale value of your vehicle down the road.
Fast Scanner - Quickly scan pages to attach in an email or keep for personal/business records
And Much More...
Sample Reports
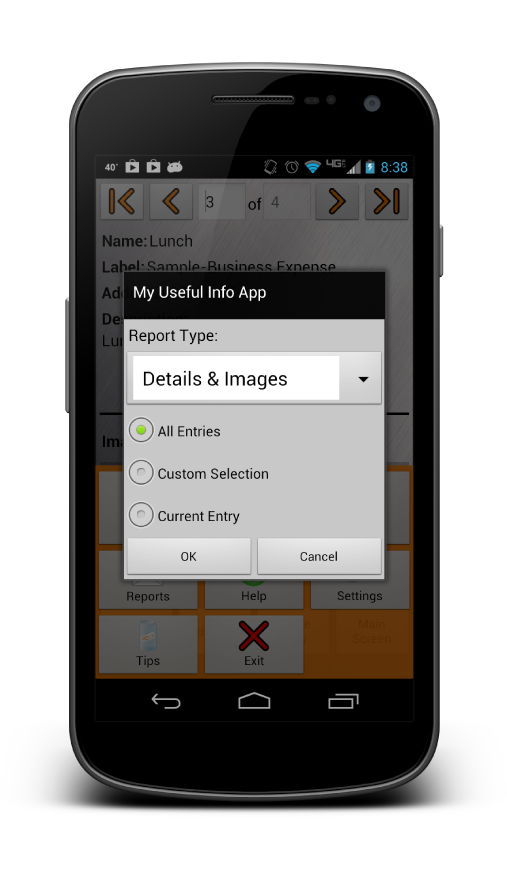
This app allows you to create PDF format reports from multiple entries and allows you to custom select entries to include in a report. Below are a four sample reports:
Details & Images - Includes Entry Images and Details. Sample Report - ![]()
Details & No Images - Includes Entry Details Only. Sample Report - ![]()
Images Only - Includes Entry Images Only. Sample Report - ![]()
Table - Presents selected entries in a table format. It can include a thumbnail of the first image of the entry. Sample Report - ![]()
Other Features
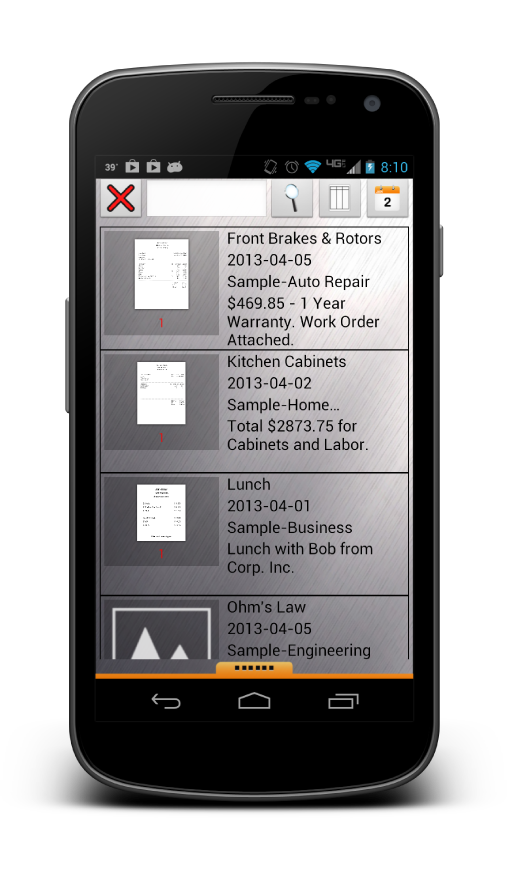
- Advanced Search & Sort Functionality
- Insert Formatted Text And Symbols
- Backup Database & Pics
Help
Contents
- Drawer Icons
- Main Screen
- Add Entry Screen
- Camera Screen
- Image Editor - Overview
- Image Editor - Crop
- Image Editor - Rotate
- Image Editor - Adjust Contrast & Brightness
- Edit Entry Screen
- List View Screen
- Detail View Screen
- Reports
- Settings
Drawer Icons
Add Item - Click to add a new entry
Show Search Box - Displays search box
Sort By - Sort entries by name, date added, or label in ascending or descending order
Help - Go to help documentation
Settings - Go to settings screen
Reports - Starts report generation dialog
Tips - Never expected always welcome
Exit - Exit Application
Main Screen
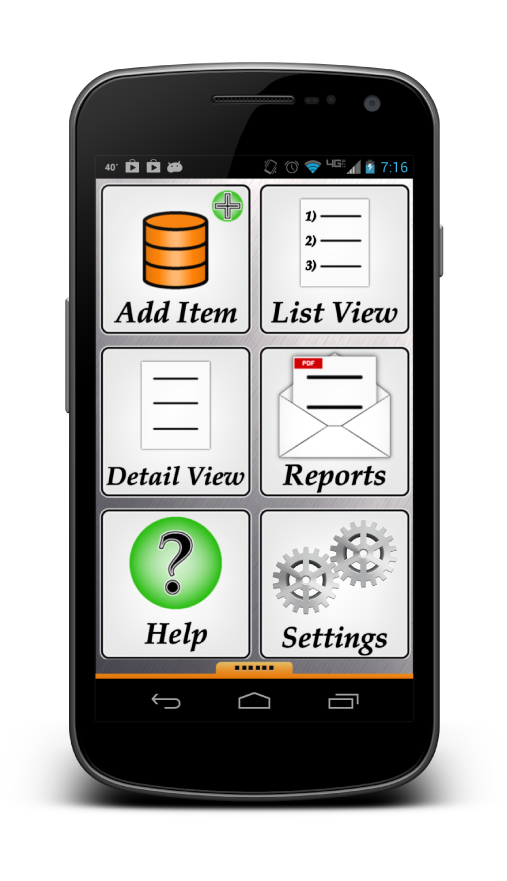
Add Item - Click to add a new entry
List View - View entries in a list
Detailed View - View entries in detail one at a time
Report - Create a report from your entries
Help - View help documentation
Settings - Go to settings screen
Add Entry Screen
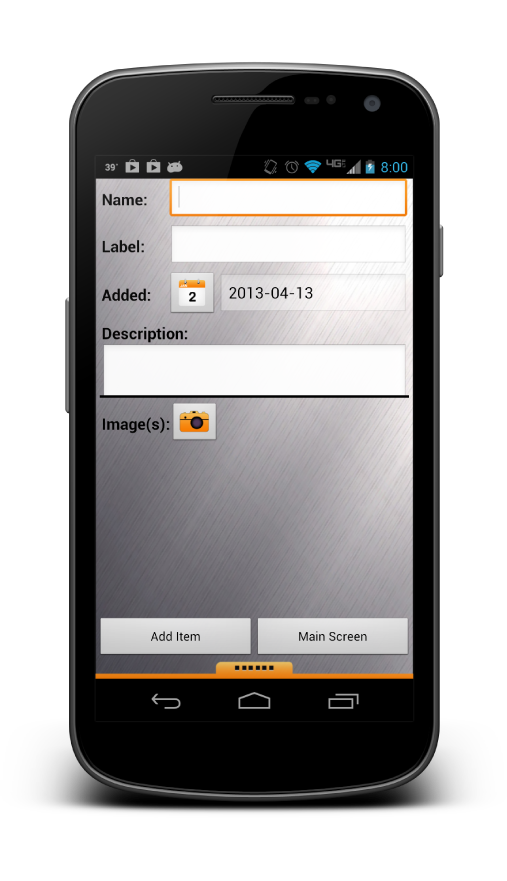
Name - Name of entry
Label - Label for entry
Added - Click ![]() to change date entry is added
to change date entry is added
Description - User description of entry
Images - Images associated with this entry will display below. Click ![]() to add an image
to add an image
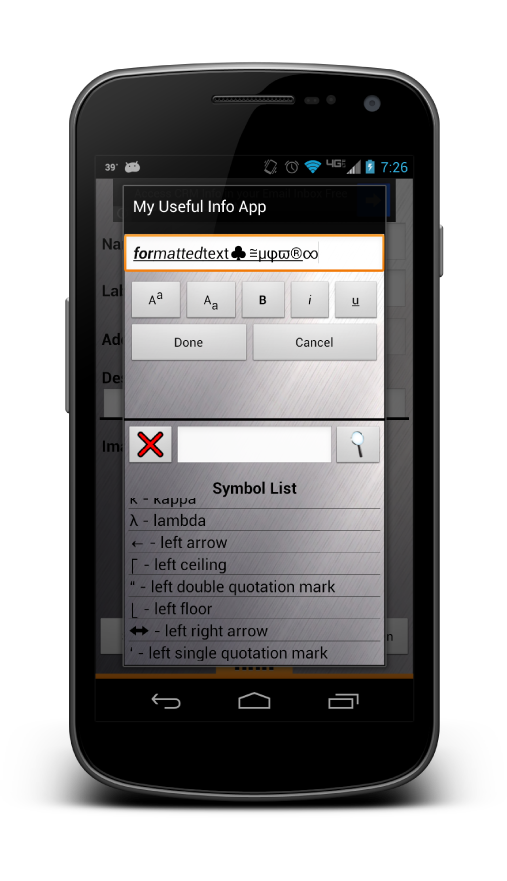
Long Click On Description Edit Box To Insert Formatted Text
First Text Box - This is the text that will be inserted into the description text box
Format Buttons - From left to right - Superscript, Subscript, Bold, Italics, and Underline. Click a button to add the formatting to the text in the box.
Done Button - Close screen and insert text
Cancel - Discard changes
Search Box - Use this search box to serach for a symbol by name
Search - Click ![]() to execute a search. The results will be shown below.
to execute a search. The results will be shown below.
Close Search Box - Click ![]() to close the search box and remove the search filter from the visible entries
to close the search box and remove the search filter from the visible entries
Camera Screen
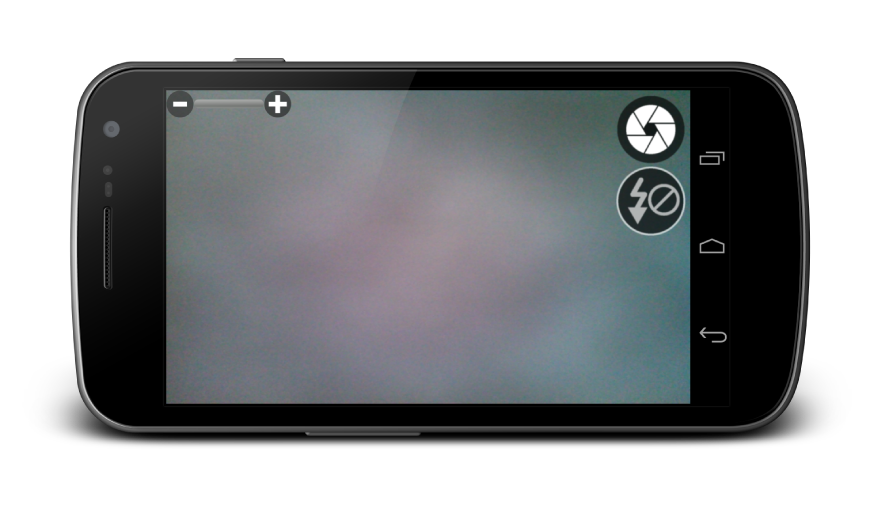
Zoom Buttons - Press the plus button to zoom in and the minus to zoom out
Shutter Button - Press and hold the shutter button to autofocus. If you want to cancel taking the picture then slide your finger off of the button instead of lifting it up.
Flash Button - Press the button to adjust the flash options for the phone
Image Editor - Overview
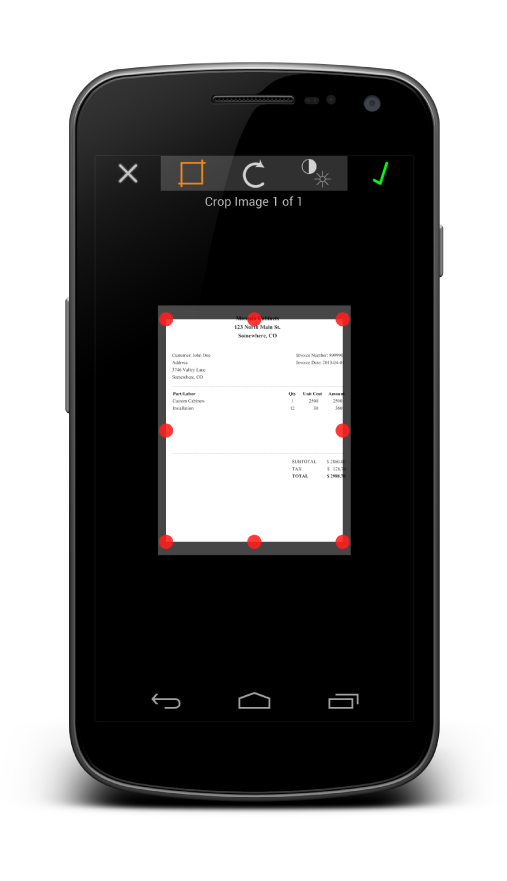
Crop - Click ![]() to crop image
to crop image
Rotate - Click ![]() to rotate image
to rotate image
Adjust Brightness & Contrast - Click ![]() to rotate image
to rotate image
Finalize Edits - Click ![]() to finalize edits
to finalize edits
Original Image - Click ![]() to revert to the original image
to revert to the original image
Image Editor - Crop

Adjust Crop Box Size - Click a red dot and drag
Pan Crop Box - Click in the center of the crop box and drag
Reset Crop Box - Double click in the center of the crop box to reset the crop box
Maximize Crop Box - Double click in the center of the crop box that has been reset
Image Editor - Rotate
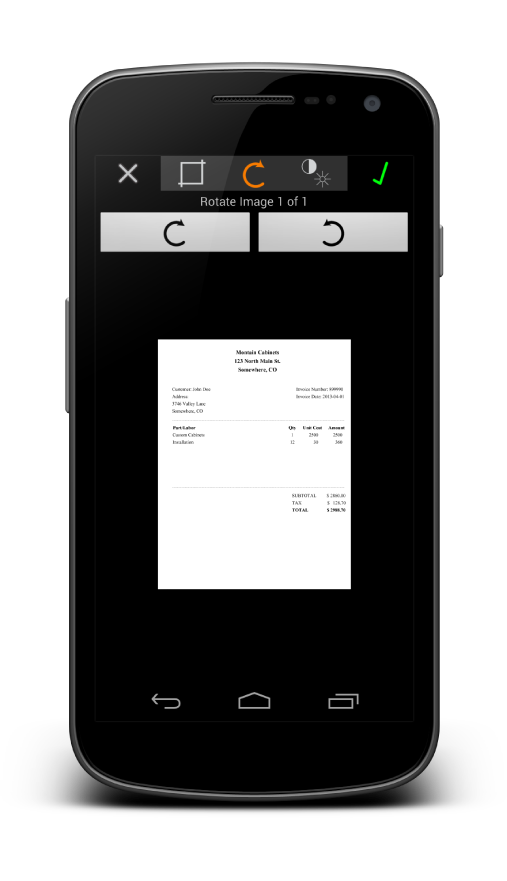
Rotate Image Clockwise - Click ![]() to rotate image clockwise
to rotate image clockwise
Rotate Image Counterclockwise - Click ![]() to rotate image counterclockwise
to rotate image counterclockwise
Image Editor - Adjust Contrast & Brightness
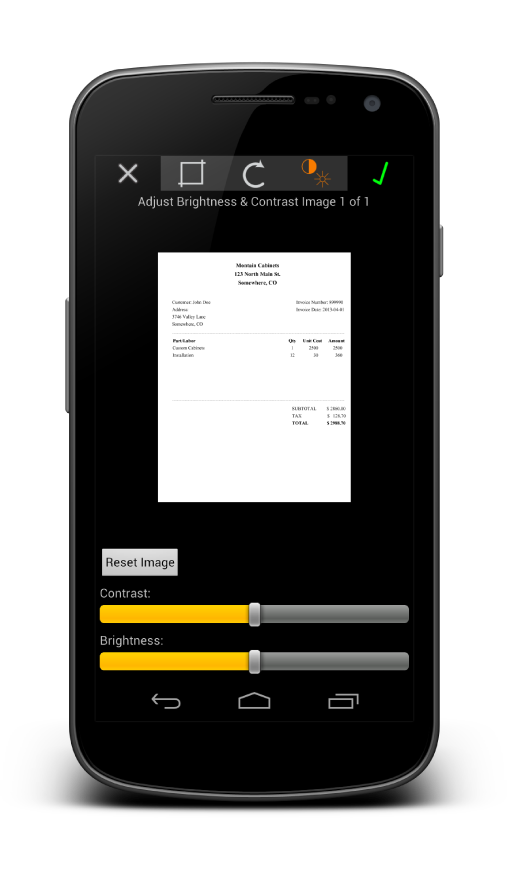
Reset Image - Resets the most recent contrast and brightness adjustments to the original values
Contrast - Slide to adjust image contrast
Brightness - Slide to adjust image brightness
Edit Entry Screen
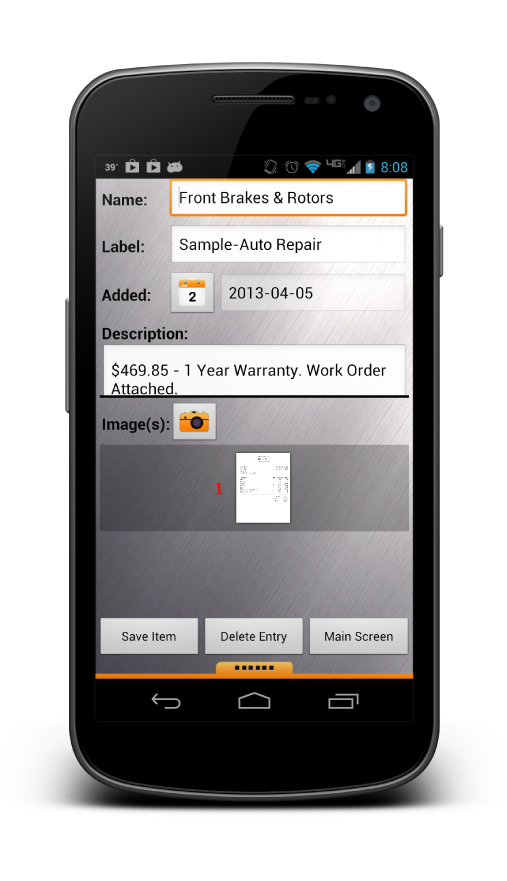
Name - Edit name of entry
Label - Edit label for entry
Added - Click ![]() to change date entry was added
to change date entry was added
Description - Edit user description of entry
Images - Images associated with this entry will display below. Click ![]() to add an image
to add an image
Save Item Button - Saves edits to entry
Delete Entry Button - Delete the current entry
Main Screen Button - Go to main screen

Long Click On Description Edit Box To Insert Formatted Text
First Text Box - This is the text that will be inserted into the description text box
Format Buttons - From left to right - Superscript, Subscript, Bold, Italics, and Underline. Click a button to add the formatting to the text in the box.
Done Button - Close screen and insert text
Cancel - Discard changes
Search Box - Use this search box to serach for a symbol by name
Search - Click ![]() to execute a search. The results will be shown below.
to execute a search. The results will be shown below.
Close Search Box - Click ![]() to close the search box and remove the search filter from the visible entries
to close the search box and remove the search filter from the visible entries
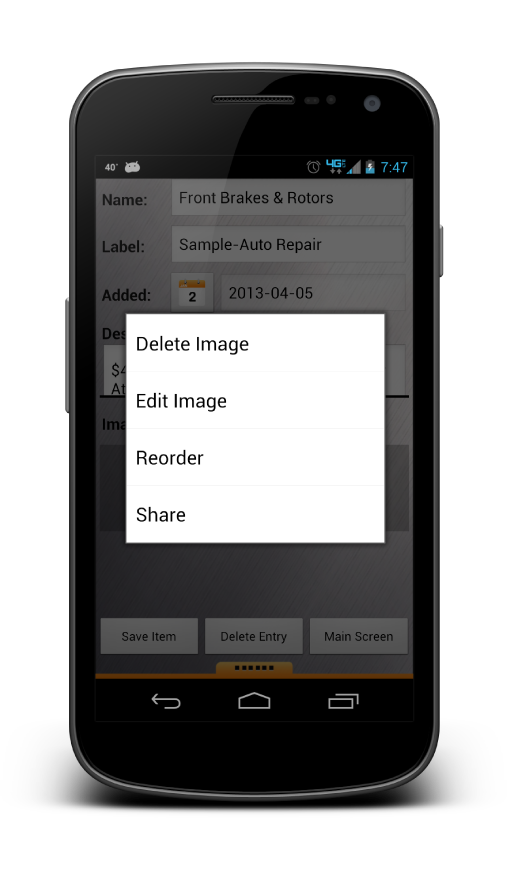
Long Click On An Image For These Options
Delete Image - Deletes selected image
Edit Image - Edit the selected image
Reorder - Reorder the selected image
Share - Share the selected image
List View Screen

Search Box - Enter text here to search for based on the settings below. Wrap text in quotes to search for an exact phrase.
Column Filter - Click ![]() to search in select columns (Name, Label, Date Added, Description). The icon will look like this
to search in select columns (Name, Label, Date Added, Description). The icon will look like this ![]() when a column filter is active.
when a column filter is active.
Date Filter - Click ![]() to search within a selected date range of when the entry was added. The icon will look like this
to search within a selected date range of when the entry was added. The icon will look like this ![]() when a date filter is active.
when a date filter is active.
Search - Click ![]() to execute a search. The results will be shown below.
to execute a search. The results will be shown below.
Close Search Box - Click ![]() to close the search box and remove the search filter from the visible entries
to close the search box and remove the search filter from the visible entries
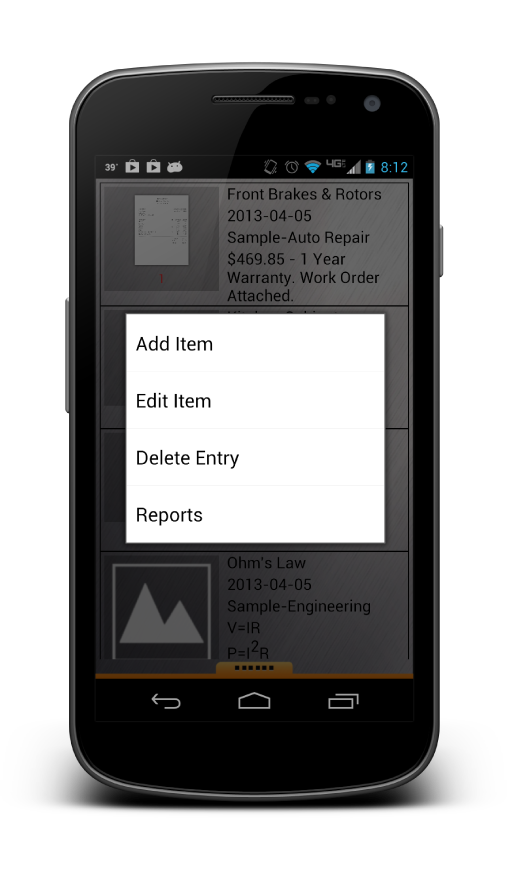
Long Click On An Entry For These Options
Add Item - Add a new entry
Edit Item - Edit item
Delete Entry - Will Delete Entry
Reports - Go to report generation dialog
Detail View Screen
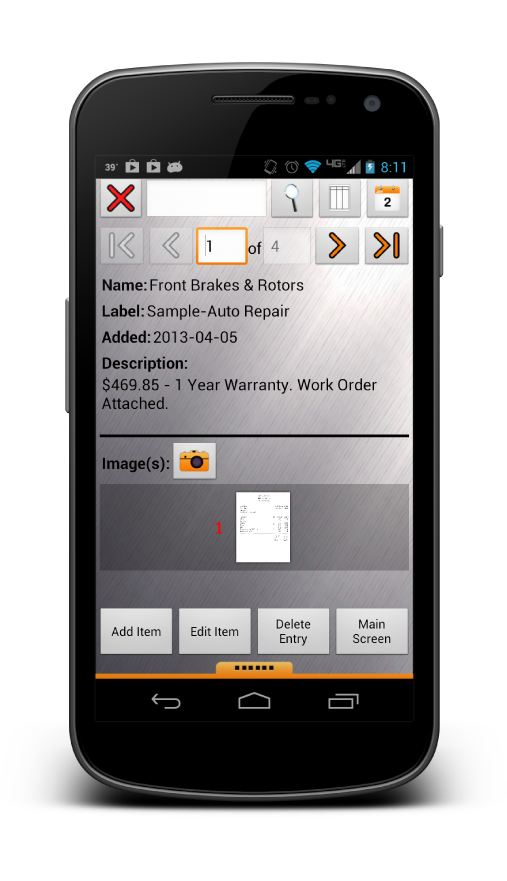
Search Box - Enter text here to search for based on the settings below. Wrap text in quotes to search for an exact phrase.
Column Filter - Click ![]() to search in select columns (Name, Label, Date Added, Description). The icon will look like this
to search in select columns (Name, Label, Date Added, Description). The icon will look like this ![]() when a column filter is active.
when a column filter is active.
Date Filter - Click ![]() to search within a selected date range of when the entry was added. The icon will look like this
to search within a selected date range of when the entry was added. The icon will look like this ![]() when a date filter is active.
when a date filter is active.
Search - Click ![]() to execute a search. The results will be shown below.
to execute a search. The results will be shown below.
Close Search Box - Click ![]() to close the search box and remove the search filter from the visible entries
to close the search box and remove the search filter from the visible entries
Entry Number Edit Text Box - Enter the number of an entry you want to view
Previous Entry - Click ![]() to view previous entry
to view previous entry
First Entry - Click ![]() to view first entry
to view first entry
Next Entry - Click ![]() to view next entry
to view next entry
Last Entry - Click ![]() to view last entry
to view last entry
Images - Images associated with this entry will display below. Click ![]() to add an image
to add an image
Add Item Button - Add and entry
Edit Item Button - Edit this entry
Delete Entry Button - Delete entry
Main Screen Button - Go to the main screen
Reports

Report Type - Click on the drop-down menu to select a report format. See below for a sample of each report type.
All Entries - If this radio button is selected then all entries will be included in the report.
Custom Selection - If this radio button is selected then the user will be prompted after the OK button is clicked to select certain entries to include in the report.
Current Entry - This option will only available when the user clicks the Reports Icon in the sliding drawer while viewing an entry in the Edit Entry Screen or Detailed View Screen.
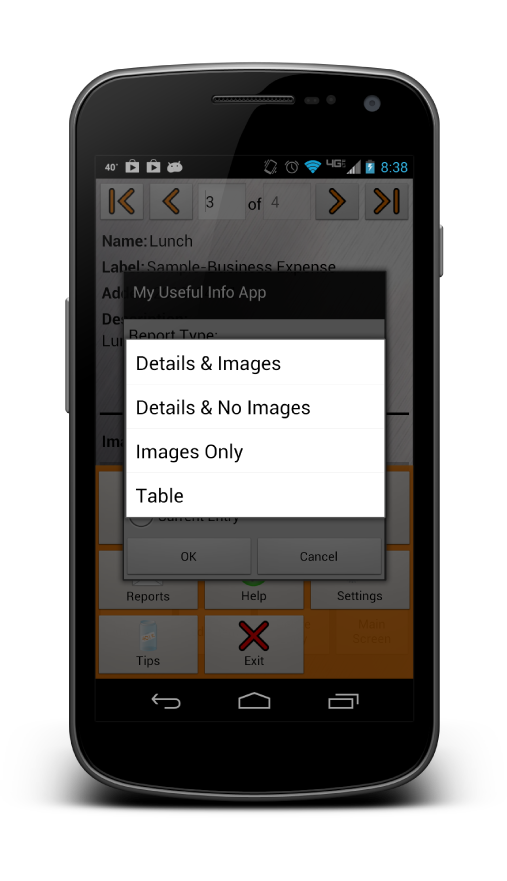
Report Types
Details & Images - Includes Entry Images and Details. Sample Report - ![]()
Details & No Images - Includes Entry Details Only. Sample Report - ![]()
Images Only - Includes Entry Images Only. Sample Report - ![]()
Table - Presents selected entries in a table format. It can include a thumbnail of the first image of the entry. Sample Report - ![]()
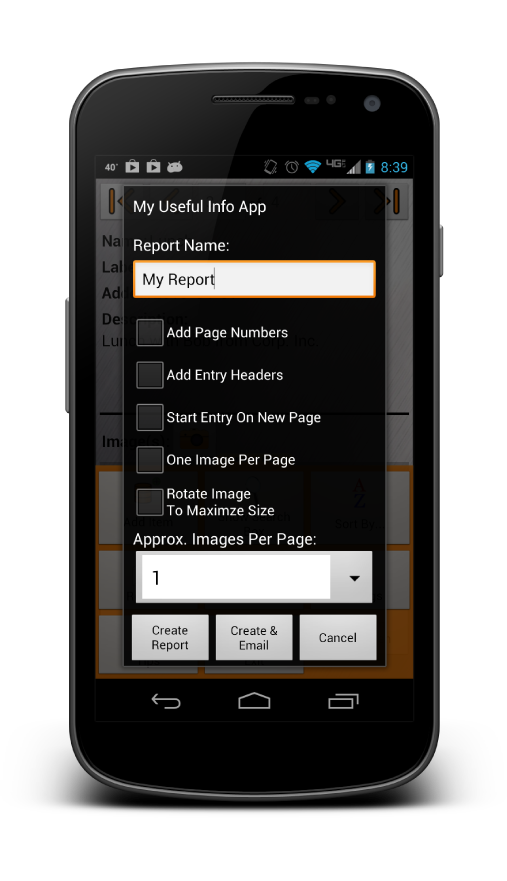
Report Settings - Details & Images/Images Only
Report Name - The name of the report
Add Page Numbers - Include page numbers at the bottom of the report page -
Add Entry Headers - Include a header at the top of the page that consists of the entry title, label, and date added.
Start Entry On New Page - Each entry will start on a new page. If entry headers are selected then this option is automatically selected as well.
One Image Per Page - Each image will be printed on its own page
Rotate Image To Maximize Size - Images will be rotated 90 degrees if it will enable them to be printed at a larger size
Approx. Images Per Page - This will scale images to allow aproximately this number of images per page.
Create Report Button - Click this to generate a report and save it in the Reports folder. The reports folder is in the application directory on the phone's external storage (By Default: /Blackburn Integrated Solutions/My Useful Information App/Reports).
Create & Email Button - Click this to generate a report and save it in the Reports folder. The reports folder is in the application directory on the phone's external storage (By Default: /Blackburn Integrated Solutions/My Useful Information App/Reports). After the report is generated an email client will be launched to email the report.
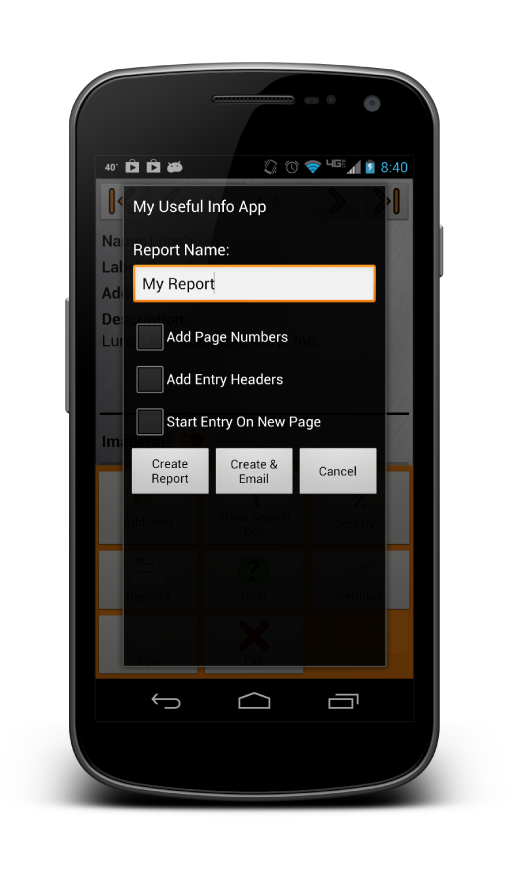
Report Settings - Details Only
Report Name - The name of the report
Add Page Numbers - Include page numbers at the bottom of the report page -
Add Entry Headers - Include a header at the top of the page that consists of the entry title, label, and date added.
Start Entry On New Page - Each entry will start on a new page. If entry headers are selected then this option is automatically selected as well.
Create Report Button - Click this to generate a report and save it in the Reports folder. The reports folder is in the application directory on the phone's external storage (By Default: /Blackburn Integrated Solutions/My Useful Information App/Reports).
Create & Email Button - Click this to generate a report and save it in the Reports folder. The reports folder is in the application directory on the phone's external storage (By Default: /Blackburn Integrated Solutions/My Useful Information App/Reports). After the report is generated an email client will be launched to email the report.
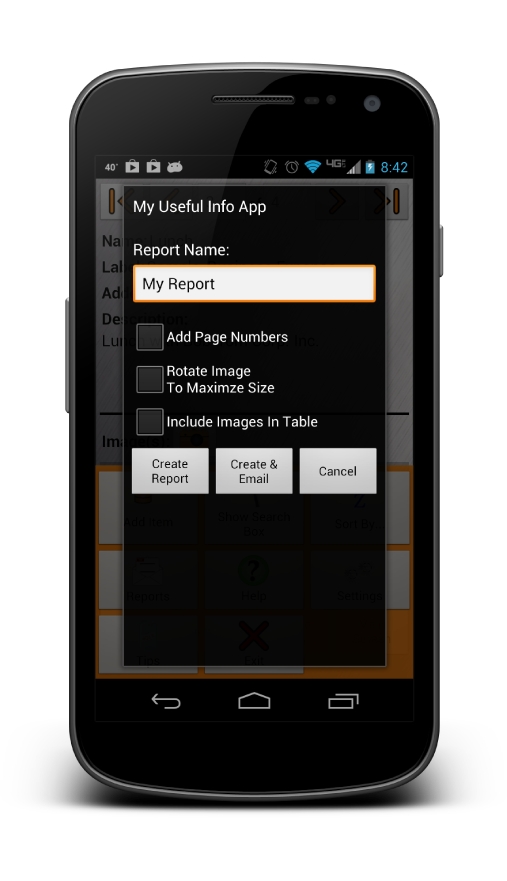
Report Settings - Table
Report Name - The name of the report
Add Page Numbers - Include page numbers at the bottom of the report page -
Rotate Image To Maximize Size - Images will be rotated 90 degrees if it will enable them to be printed at a larger size
Include Images In Table - Images will be included in table
Create Report Button - Click this to generate a report and save it in the Reports folder. The reports folder is in the application directory on the phone's external storage (By Default: /Blackburn Integrated Solutions/My Useful Information App/Reports).
Create & Email Button - Click this to generate a report and save it in the Reports folder. The reports folder is in the application directory on the phone's external storage (By Default: /Blackburn Integrated Solutions/My Useful Information App/Reports). After the report is generated an email client will be launched to email the report.
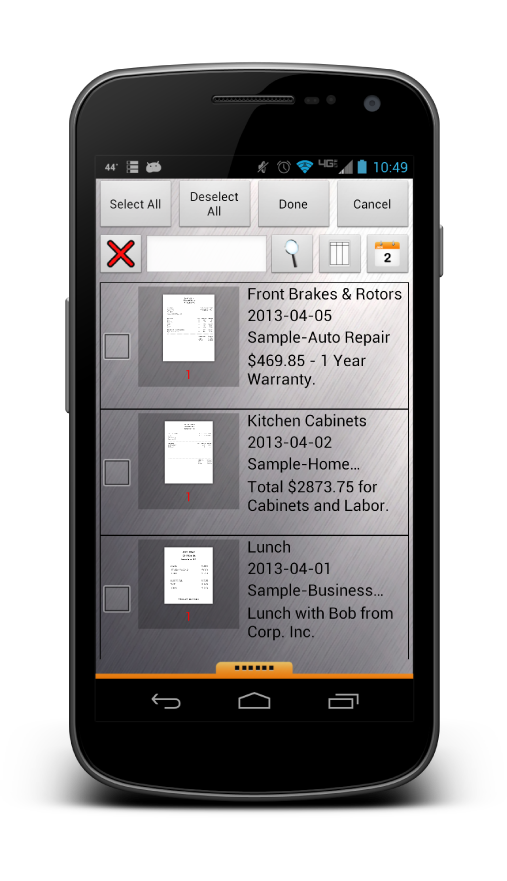
Custom Entry Selection
Search Bar - This works just like in the List View Screen to sort and filter entries. If Select All or Deselect All Buttons are clicked while a Search Filter is applied, then only the visible entries will have their selection status set.
Settings
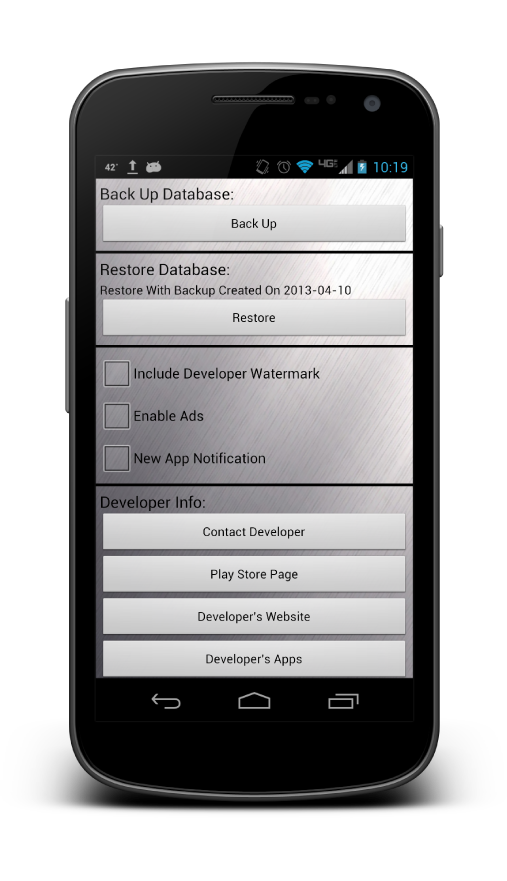
Back Up Button - This will back up all images and database files to external storage (By Default: /Blackburn Integrated Solutions/My Useful Information App/Database Backup). This will overwrite all files that are in this folder
Restore Button - This will restore the most current backup and overwrite the existing database and images
Include Developer Watermark - This is available on the pro version and will include a watermark with the app logo, name, and developer website.
Enable Ads - This is available on the pro version and when selected will display ads in the app.
New App Notification - This is will raise a notification in the action bar when a we release a new android application.
Contact Developer Button - Click this button to send us an email us.
Play Store Page Button - This will take you to our play store page
Developer's Website Button - This will take you to our website
Developer's Apps Button - This will take you to the playstore to see our other apps
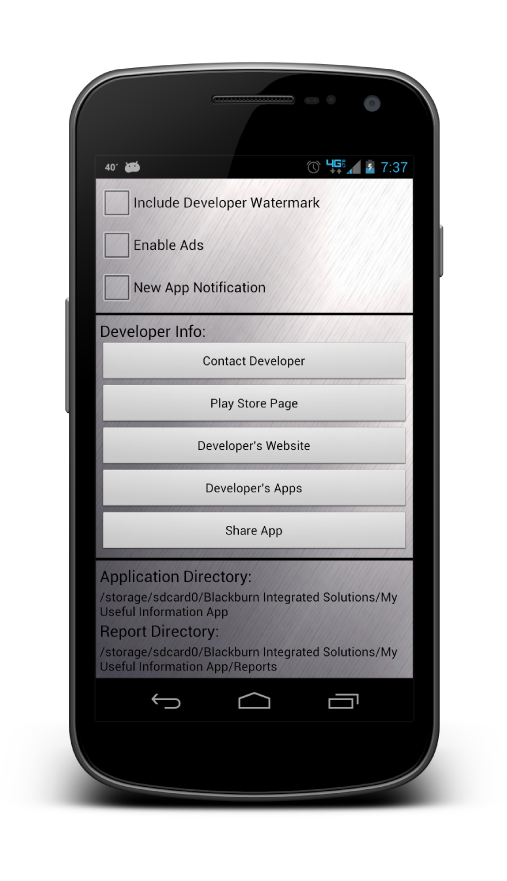
Share App Button - Allows you to send a link for someone else to download this app
Application Directory - This is the path where app related files are stored
Report Directory - This is the path where reports are stored
Versions & Bugs
